Reviewed by the FTrade Towing-Hardware Engineering Team — 20+ years designing, lab-testing, and field-fitting trailer hitches and towing hardware.
Installing a cargo carrier hitch is a 15–30 minute job that any DIY owner can finish with basic hand tools. A cargo carrier hitch bolts into your vehicle’s receiver tube and turns spare towing capacity into secure, lockable cargo space behind the tailgate. The process is straightforward: confirm fitment, assemble the platform, slide the shank into the receiver, lock it with a pin, tame the wobble, load your gear, and re-check before driving. Before you buy hardware, review our trailer hitches and ball mounts to match the right receiver size and rating. Most failures come from mismatched tubes or overloaded tongue weight, not from the carrier itself. Having test-fit hundreds of carriers in our workshop, we wrote this guide with the torque figures, class ratings, and a pre-drive checklist that make your first install safe and repeatable.
Verify Fit and Gather Tools Before the Cargo Carrier Hitch Install
Match Receiver Size and Tongue Weight
- Hitch receivers use three tube sizes — 1-1/4 in (Class I/II), 2 in (Class III/IV), and 2-1/2 in (Class V). A tape measure across the square opening confirms the size in seconds.
- Tongue weight is the downward load on the receiver and is separate from towing capacity. A vehicle rated to tow 9,400 lbs can still cap tongue weight at 500 lbs, so always follow the lower figure (per SAE J684 class ratings).
- Read ratings on the driver’s door-jamb sticker or owner’s manual, then subtract the carrier’s own weight to get your safe cargo capacity.
- In our lab, every hitch shank is proof-tested to SAE J684 structural tensile and fatigue limits, and the anti-rust finish must survive 500+ hours of salt-spray testing before it ships — the same standard we hold for the hitches and ball mounts we supply.
Tongue weight capacity by hitch class (lbs):
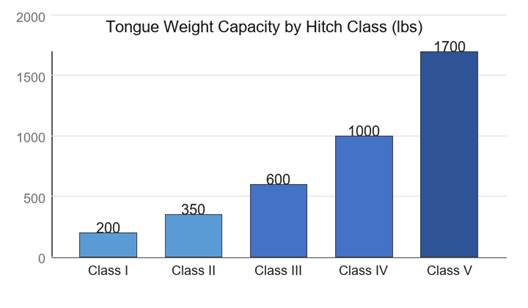
Typical SAE J684 tongue-weight maximums by hitch class — always confirm against your vehicle’s door-jamb label.
Notice the steep jump from Class I (200 lb) to Class V (1,700 lb): stepping up one class roughly doubles what you can carry behind the axle. Always size the carrier to the lower of the vehicle rating and the carrier’s own limit, then re-check the door-jamb label before every heavy trip.
Tools and Hardware You Need
- A socket wrench, torque wrench, adjustable wrench, screwdriver, and rubber mallet cover nearly every install.
- A hitch pin with R-clip locks the shank in the receiver; an anti-rattle wedge removes play. Many carriers ship these, though wholesale suppliers also sell them separately.
- If you source for resale, specify torque values and certified hardware from your supplier so every unit your customers receive installs correctly the first time.
Assemble and Mount the Cargo Carrier Hitch
Bolt the Shank to the Platform
- Carriers arrive pre-drilled, so join the shank to the platform with 4–6 bolts — no welding required.
- Tighten to the manual’s torque spec: too loose and parts shift; too tight and you strip threads or crack metal. Re-check every bolt after the first pass.
- Add reflectors, and if the carrier blocks your taillights, fit a light kit for night visibility.
Insert, Pin, and Stop the Wobble
- Slide the shank straight into the receiver until the pin holes align; tap with a mallet if paint or rust binds.
- Push a locking hitch pin through both holes and snap the R-clip — or choose a locking pin that also deters theft. Our trailer locks and pins line covers anti-theft options built to ISO 9001.
- An anti-rattle bolt presses the shank against the tube wall to kill clanking; a double-nut setup prevents loosening on long highway drives.
Field-Proven Tips From the Bench
- Weigh the real tongue weight with a bathroom scale under the loaded carrier’s tongue — that reading, not a catalog guess, is what you compare against your rating.
- Re-torque after a 10-mile warm-up drive; thermal cycling relaxes fasteners more than the initial pass.
- Inspect the receiver tube for rust pits or cracks before mounting — a compromised tube fails long before the carrier does.
- More than 1/4 in (6 mm) of up-down play at the receiver mouth means worn internals; replace the receiver before loading a carrier.
Load, Secure, and Run Final Cargo Carrier Hitch Checks
Distribute Weight and Tie Down
- Stack heavy items low and close to the vehicle; keep light items on top to lower the center of gravity and cut tip-over risk.
- Cross at least two ratchet straps over the load and hook them to the frame — use four for bulky cargo. Our cargo control solutions provide rated straps and nets for the job.
- Cargo securement is repeatedly among the most cited violations in roadside inspections (FMCSA cargo-securement rules), so never rely on bungee cords alone.
Enforcement data backs this up: in the CVSA 2023 International Roadcheck, cargo securement was again among the most cited violations. That is a clear signal to treat straps and weight balance as mandatory, not optional, on every trip.
4-Point Pre-Drive Inspection
| Check | What to verify | Risk if skipped |
| Hitch pin | Fully inserted through receiver + shank; R-clip snapped | Carrier can slide out in a turn |
| Anti-rattle | Tight against the shank, no play | Movement worsens over bumps, stresses the pin |
| Clearance | Plate, taillights, signals unblocked | Blocked lights = citation |
| Straps | All tight, no cargo shifted | Loose load can fall onto the road |
These checks take about two minutes. Re-run them after the first 10 miles, because vibration loosens hardware early. A factory or supplier can ship replacement hardware if bolts go missing.

A cargo carrier hitch install becomes repeatable once you respect fitment and torque. Check the pin twice, kill the wobble, and never exceed the tongue-weight limit. For buyers specifying hardware at volume, partner with a manufacturer that publishes its test data and certifies to SAE J684 and ISO 9001. Grab your tools and hit the road with confidence.